Monday, December 22, 2014

Blossom & Burlap Christmas Tree for Donna Salazar

I've been working on a very special Christmas decor project that I finally get to share with you today. I created this Blossom & Burlap Christmas Tree, featuring one of Donna Salazar's fabulous Spellbinders Bitty Blossoms dies. There are just over 100 Bitty Blossom flowers decorating my tree. 

These beautiful flowers come together so fast, and I'll share a little secret with you. Our church is a 30 minute drive away, making it an hour round trip. Gary prefers to drive most times, so I put that hour to good use making flowers for my stash. I pre-cut Bitty Blossoms and take them along with my flower making tool kit. I can easily create a dozen or more on each trip. For today's project I've used those blossoms along with burlap, lace, and gold metallic fabric mesh to create a tree to decorate our Christmas dinner table.


Tips and Techniques
I bought a paper mache cone at my local craft store, imagining a Christmas tree covered with Bitty Blossoms. This is what I came up with. I started by adhering swirling rows of Bitty Blossoms. A tutorial for my Bitty Blossoms can be found HERE.

Then I filled in-between with tufts of layered burlap, lace, and gold metallic mesh and mini pinecones picked from our daughter's yard. 

My sweet friend, Lisa, came across this simple gold star as I was creating and offered it to me. It couldn't be more perfect to adorn the top of my tree. 

All in all, it's the Bitty Blossoms that really shine on my tree giving it such a festive holiday feel.


Donna Salazar Products
GCD Studios ~ Antiquities Collection
Spellbinders ~ Bitty Blossom Dies

Other Products
Burlap
Lace Panel
Gold Metallic Mesh
Gold Metal Star
Craft Essentials ~ Birch Round
Pine Cones ~ Yard
Darice ~ Paper Mache Craft Cone – 13.75 x 5 in
Helmar ~ 450 Quick Dry Adhesive

Thanks so much for taking time out of your busy holiday preparations to stop by.
I'd like to wish each of you a very merry Christmas. 
~ Blessings ~

Wednesday, December 17, 2014

Christmas Ornament Tags for the Leaky Shed Studio/BoBunny Product Swap

Leaky Shed and BoBunny are teaming up all December long to inspire you with fabulous projects and products!

For my second swap project, I've created Christmas ornament tags combining the gorgeous products from Leaky Shed Studio and BoBunny. It's become a tradition for me to create special handcrafted ornaments for each of our children for Christmas. This year, I have decorated fabulous Leaky Shed ornaments and attached them to tags created with beautiful BoBunny products. They can be used as a decor piece or the ornaments can be removed to hang on the tree.


Tips & Techniques
This tree isn't really meant to be an ornament, however, decorated and backed with lovely BoBunny paper, it turned out to be a darling one. I painted the chipboard white, then heat embossed with sparkly holographic embossing powder. I edged parts of the tree with a snow marker, then added more sparkle with dabs of BoBunny Gold Glitter Paste and Mocha Gems. The music paper backing the tree was spritzed with green Glimmer Mist. I cut the little packages from BoBunny paper and wrapped the tree trunk and packages with jute twine.

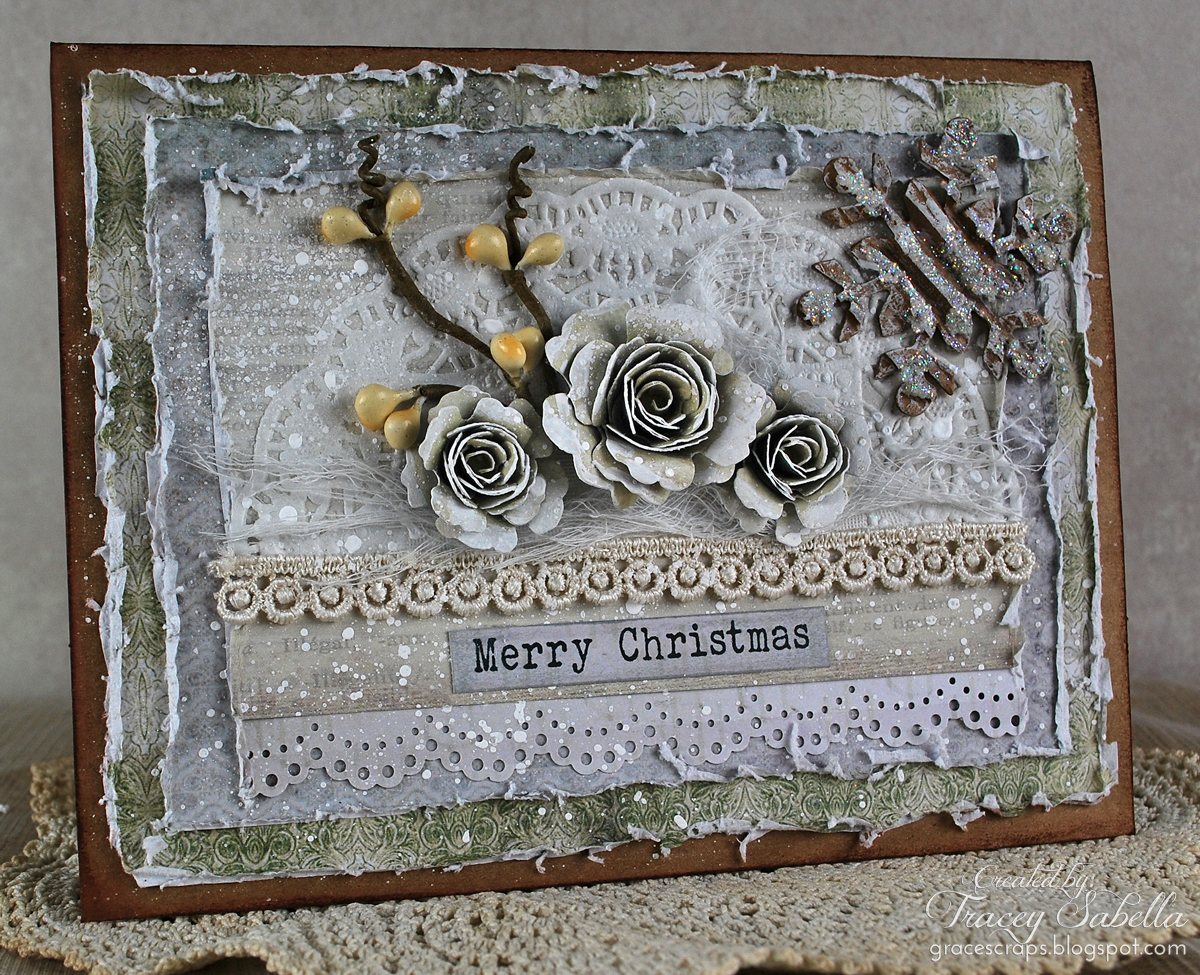
I cut this snowflake from corrugated cardboard, dry brushed with white gesso, sprinkled with silver glitter mix, dabbed with Gold Glitter Paste, and finished off by centering with a Mocha gem.

This tag is for our son, and I wanted to have a masculine feel. I changed up the BoBunny Chipboard stickers by arranging the "JOY" letters onto the ruler piece and inked the edges.

I painted this Snowflake Scroll Ornament using gold on the rim and white for the snowflake, leaving the scrollwork bare. The scrollwork is brushed with BoBunny Copper Glitter Paste and the snowflake with Silver Glitter Paste. The tag is splattered with white drawing ink for a snowy effect.

I cut this darling deer tag from BoBunny paper and distressed the edges before wrapping with twine. I backed it with burlap and white chicken wire. I created the background snowflake by misting through a stencil with BoBunny Sugar Glimmer Spray and when dry stenciled again with Silver Glitter paste.

This ornament is super easy to create. I painted the Leaky Shed Studio Snowflake Ornament with white gesso and when dry brushed lightly with BoBunny Silver Glitter Paste and centered with a BoBunny Pearl from the Powder Mountain Gems.

The tag is stamped randomly with the BoBunny It Is Written stamp, misted with BoBunny Gold Glimmer Spray, the splattered with white drawing ink.

There are so many beautiful elements and tags on the BoBunny papers. I've cut out some of them to finish off my tag. I've inked the edges and splattered with more of the white ink. The flower is layered with BoBunny Christmas Collage Petals and centered with a Mocha Gem. I had some overspray of Gold Glimmer spray on my craft mat and rubbed my flower through it to highlight the tips. I've punched layers of Christmas Collage paper for the bottom and edged them by brushing with Gold Glimmer Spray.

Check out this amazing prize package:
BoBunny has generously provided this fabulous give-away package for one of our fortunate followers. 

To be eligible to win you need to do the following:  
~ Leave a comment on each Leaky Shed Studio Facebook Page Post during the swap, December 9 to 31. You have until midnight EST on January 3rd to leave your comments. 

~ The randomly selected winner will be announced on January 5th, 2015.  Be sure to check out our links for more inspiration from our talented team.

* * * * * * * * * * * * * *

For a chance to win a fabulous Leaky Shed Studio chipboard prize package, stop on by the BoBunny blog for all the details.


Leaky Shed Studio Products
Snowflake Ornament

BoBunny Products
*** A special thanks to Juliana Michaels who shared her
BoBunny mixed media products with me. 
Christmas Collage ~ Decoupage
Christmas Collage ~ Glad Tidings
Christmas Collage ~ Caroling
Christmas Collage ~ Stamps
Christmas Collage ~ Comet 
Layered Chipboard ~ Christmas Collage
Christmas Collage – Petals
Double Dot – Jewels – Mocha 
Buttons – Mistletoe 
Jewels – Powder Mountain 
Stamps ~ It Is Written
Stamps ~ Holiday Wishes
Glitter Paste ~ Copper
Glitter Paste ~ Silver
Glitter Paste ~ Gold
DoubleDot ~ Sugar Glimmer Spray – Sugar
BoBunny ~ Double Dot – Glimmer Spray – Gold 

Other Products
We R Memory Keepers ~ Cardstock – Happy Campers Marshmallow
Ranger ~ Craft Tags - #8 Manila
Tim Holtz – idea-ology – Label Letters
May Arts ~ Metallic String Iridescent White (Really Reasonable Ribbon)
Snug Hug Seam Binding ~ White (Really Reasonable Ribbon)
Bead Landing ~ Hemp Cord with Metallic Twist
Jute Twine ~ Stash
Burlap ~ Stash
We R Memory Keepers ~ Cool Metal Eyelets - Wide
Darice ~ Berry Stems
Darice ~ Chicken Wire, White
Clearsnap by Donna Salazar ~ Mix’d Media Inx – Truffle, Jasmine
Clearsnap by Donna Salazar ~ Mix’d Media Inx CHOX – Sparrow
Ranger ~ Distress Ink – Brushed Corduroy, Gathered Twigs
Liquitex ~ Gesso – White; Extra Thick Gesso
Higgins ~ Drawing Ink - White
DecoArt ~ Dazzling Metallics Paint – Champagne Gold
Ranger ~ Embossing Powder – Holographic
Stampendous ~ Fran-tage – Silver Halo Glitter Mix
Tattered Angels ~ Glimmer Mist – Garden Fairy, Silver Bells
Marvy ~ Snow Marker
Martha Stewart ~ Punch – Eyelet Lace
Martha Stewart ~ Cake Stencils – Holiday 
Helmar ~ 450 Quick Dry Adhesive
Helmar ~ Premium Craft Glue
Helmar ~ ZapDots - 1/4" White
Zutter by Donna Salazar – Distrezz-it-All
Tim Holtz ~ Distress Tool
Karen Foster ~ Clickit
Liquitex ~ Splatter Brush

Thanks so much for stopping by. I treasure your comments!

~ Blessings ~

Wednesday, December 10, 2014

Girlie Grunge Christmas Card for Donna Salazar

I hope you are enjoying this holiday season. Today I'm sharing this girlie grunge Christmas card I created for a special friend featuring amazing Donna Salazar products.


Tips and Techniques
I used Donna's Spellbinders Bitty Blossoms dies to create these sweet little roses. A tutorial for my Bitty Blossoms can be found HERE.

The flowers are dry brushed with white gesso then the background and flowers splattered with white drawing ink. 

The layer edges are grunged up with Donna's Zutter Distrezz-it-All.

I printed out the sentiment using a typewriter font found on the internet. To help it stand out, I rubbed the edges with Donna's Clearsnap Pewter Mix'd Media Inx.

To glam up this rustic corrugated snowflake, I dry brushed with white gesso, then dabbed with sparkle effects paste. To add more sparkle I sprinkled the wet paste with Donna's Sugar Shimmer Twinkle Dust Glitter.

The card edge is rubbed with Leather Mix'd Media Inx.

Thanks so much for stopping by today. I hope you've been inspired to pull out your Donna Salazar supplies to create holiday projects of your own. 


Donna Salazar Products
GCD Studio ~ Natural Beauty 12x12” Paper Pad
Clearsnap ~ Mix’d Media Inx – Leather, Pewter
Clearsnap ~ Twinkle Dust Glitter – Sugar Shimmer
Spellbinders ~ Bitty Blossoms Dies
Zutter ~ Distrezz-it-All

Other Products
Kraft Card Base – Stash
Doily – Stash 
Corrugated Snowflake ~ Stash
Darice ~ Berry Stems 
Lace ~ Stash 
Cheesecloth ~ Stash
Martha Stewart ~ Sparkle Texture Effect
Liquitex ~ Gesso – White 
Higgins ~ Drawing Ink – white
Martha Stewart ~ Punch – Doily Lace
Font ~ Elegant Typewriter – from the internet
Helmar ~ 450 Quick Dry Adhesive
Helmar ~ Premium Craft Glue
Spellbinders ~ Artisan X-plorer

Thanks for stopping by! I treasure your comments.
~ Blessings ~

Tuesday, December 9, 2014

December Snow details for the Leaky Shed Studio / BoBunny Product Swap


I'm back today to share the details for my "December Snow" layout
shared earlier this month for my Once Upon A...Sketch post.

I have featured Leaky Shed Studio Snowflakes and Snowflake Border chipboard paired with the BoBunny Christmas Collage Collection. I had so much fun working with these gorgeous products. Although this paper is designed as a Christmas collection, some of the pages lend themselves beautifully to other uses like this wintry page.

"December Snow"

Tips and Techniques
I've clustered gorgeous BoBunny Daisy and Bouquet flowers, jewels, buttons, trinkets, lace, stickers, and layered chipboard along with handcrafted twine flowers around my snowflake photo. For a wintry feel, I've brushed and dabbed white crackle paint over the elements.

Here's another view.

One of Leaky Shed Studio's new release pieces is this gorgeous Snowflake Border (Small).  I've simply dabbed it with BoBunny Gold Glitter Paste, leaving bits of the bare chipboard peeking through. I've added a Mocha BoBunny Jewel to the center of each flake. 

My title uses the BoBunny Combo Stickers. The letters are close in color to my background, so I adhered them then lightly sanded to help them pop. The green flourish behind the snowflakes is also from the the Christmas Collage Combo Sticker sheet.

Above the photo I've clustered one of my handcrafted twine flowers centered with a BoBunny snowflake button and one of the Leaky Shed Studio Snowflakes from the Six Snowflakes set. I edged the photo with white crackle paint for a snowy effect.

One more snowy cluster.
A tutorial for my twine flower can be found HERE

I used one of the tags from the Decoupage page and cut more flags from paper scraps for my banner. I dry brushed the banner with gesso. Above the tags is a piece of BoBunny lace dabbed with Gold Glitter Paste and Crackle Paint.

In the center of the page and under the title, I spritzed BoBunny Bronze Glimmer Spray. Since it is a winter page, I wanted to lighten it just a bit, so stamped the background using BoBunny's It is Written and Stained Textures stamp sets. I then heat embossed using Shabby White Embossing Enamel by Fran-tage. 

More texture is added by splattering with white and green drawing ink. I've scattered some of the BoBunny Mocha Jewels around the page along with another of the Leaky Shed Studio Snowflakes.

Thanks so much for stopping by today.
I hope you have been inspired to create a layout combining
Leaky Shed Studio Chipboard and BoBunny products.

Leaky Shed Studio Products

Check out this amazing prize package.
BoBunny has generously provided this fabulous give-away package for one of our fortunate followers. 

To be eligible to win you need to do the following:  
Leave a comment on each Leaky Shed Studio Facebook Page Post during the swap, December 9 to 31. You have until midnight EST on January 3rd to leave your comments. 

The randomly selected winner will be announced on January 5th, 2015.  Be sure to check out our links for more inspiration from our talented team.

* * * * * * * * * * * * * *

For a chance to win a fabulous Leaky Shed Studio chipboard prize package, stop on by the BoBunny blog for all the details.

Leaky Shed Studio Products
Six Snowflakes
Snowflake Border, Small

BoBunny Products
BoBunny ~ Christmas Collage – Flurry 
BoBunny ~ Christmas Collage – Decoupage 
BoBunny ~ Christmas Collage – Glad Tidings
BoBunny ~ Christmas Collage – Layered Chipboard
BoBunny ~ Christmas Collage – Combo Stickers
BoBunny ~ Blossoms – Natural Earth Daisy
BoBunny ~ Blossoms –Wildberry Daisy
BoBunny ~ Blossoms –Natural Earth Bouquet
BoBunny ~ Lace - Wildberry
BoBunny ~ Snowfall Trinkets 
BoBunny ~ Blitzen Buttons
BoBunny ~ Rejoice Buttons
BoBunny ~ Double Dot Jewels - Mocha
BoBunny ~ Glitter Paste – Gold 
BoBunny ~ Glimmer Spray - Bronze
BoBunny ~ Stamps – It is Written 
BoBunny ~ Stamps – Stained Textures

Other Products
Berries ~ Stash
Hemp Twine ~ Stash
Jute Twine ~ Stash
Liquitex ~ Gesso – Clear, White
Viva ~ Crackle Paint - White
Ranger ~ Distress Ink – Gathered Twigs; Embossing Ink; Black Soot
Stampendous ~ Fran-tage – Embossing Enamel, Shabby White
Higgins ~ Drawing Ink – White
Dailer Downey – Acrylic Artists Ink – Sap Green
Liquitex ~ Free Style – Splatter Brush
Helmar ~ 450 Quick Dry Adhesive
Helmar ~ Premium Craft Glue
Helmar ~ Zapdots - 1/4" Square, White

Don't forget this is the final Once Upon A...Sketch Challenge.
To link your project, please stop by the OUAS Blog HERE.

Thanks for stopping by! I treasure your comments.

~ Blessings ~

Friday, December 5, 2014

It's a Swap with Leaky Shed Studio and BoBunny!!

I've got some exciting news to announce. . .


It's a wintry swap with Leaky Shed Studio and BoBunny!

Leaky Shed Studio and BoBunny are teaming up during the month of December to bring Holiday Inspiration to your home. We here at Leaky Shed Studio love BoBunny and their amazing products. We are thrilled to be partnering with such a wonderful company.  

December 9 through 31, both design teams will be creating unique projects with Leaky Shed Studio chipboard and BoBunny Christmas collections.  After you check out the projects from our very own Leaky Shed Studio talented design team, head on over to the BoBunny blog to see what those gifted ladies have created for you. Join us in some holiday cheer by commenting on both blogs and let the BoBunny designers know we sent you.

To celebrate our Leaky Shed Studio/BoBunny Swap, we're giving away this fabulous prize package filled with gorgeous BoBunny products. 


To be eligible to win you need to do the following:  

Leave a comment on each Leaky Shed Studio Facebook Page Post during the swap, December 9 to 31. You have until midnight EST on January 3rd to leave your comments. 

The randomly selected winner will be announced on January 5th, 2015.  Be sure to check out our links for more inspiration from our talented team.

Leaky Shed Studio

If you are on Pinterest, check out the special Pinterest Board that we have created for this swap!  Re-pin some of your favorite projects and show us some love.

Happy holidays! Check back with us throughout the month and don’t forget to leave Facebook comments for your chance to win the BoBunny Prize Pack. BoBunny is also giving away a Leaky Shed Studio Prize Pack so go check out BoBunny and leave a comment on their Facebook page as well.


Thanks for stopping by!! 
~ Blessings ~

Thursday, December 4, 2014

Published in the December Issue of Scrapbooking.com Magazine

It's always so amazing to have my work published,
and am thrilled to share that one of my layouts is in the

Please click on the link to view the article:

Our Girls ~ Chipboard Department

Be sure to check out the entire December Issue of Scrapbooking.com Magazine.
You are sure to be inspired and best of all it's free!

~ Blessings ~

Monday, December 1, 2014

December Snow Mixed Media Layout for the OUAS Final Challenge

It's time for our Once Upon A...Sketch December Reveal.

December Journaling Theme ~ "It's December . . ."

This will be our final challenge:

Our OUAS founder, Nadia Cannizzo, has realized with her growing family, that it is time for these delightful and inspiring challenge to come to a close, so this will be our final challenge. I hope many of you will join us for this challenge despite the busyness of the holiday season to show Nadia your support during this final challenge. To read Nadia's farewell comments, please stop by the OUAS blog to read Nadia's farewell comments HERE.

The crisp, cold days of December in Ohio bring snow.
I've always been in awe of the beauty God creates in each and every flake.

"December Snow"


Journaling Theme: "It's December..." 

You are free to interpret our theme ANY WAY you like. It is for your inspiration and this theme word DOES NOT need to be part of your title or journaling. But please make sure your layout is based on the sketch below and includes journaling (hidden journalling is fine). Acceptable journaling is MORE than just a sentence, or generic writing such as date/place etc. It needs to be present and at least 3 lines long. Remember, hidden journaling (under a photo/tag or behind your page) is perfectly fine but please DO let us know in your post where your journaling is! 

December Sketch
I've flipped the sketch for my page. 

For challenge details, more design team inspiration, and to link your project go HERE.

I'll be posting my Tips and Techniques with lots of close-up photos
on December 9th, so please drop back then for all the details.

I do have a couple photos to share showing my hidden journaling
on the back of a tag tucked behind my photo.


You can stop by the OUAS blog to link your project HERE.

Saturday, November 22, 2014

"Faith Shines Bright" Mixed Media Layout for Donna Salazar

Faith is an important part of our lives, and we are so happy that Elizabeth and Andrew are carrying that faith into their marriage and lives together. I love this photo from their wedding where their love for each other and for our Lord shines so brightly in their faces. I've featured lots of Donna Salazar products and have used Mistra's November Girlie Grunge Sketch-n-Color for inspiration.

"Faith Shines Bright"
Mixed Media Layout by Tracey Sabella for Donna Salazar - Love; Wedding; Faith; Handcrafted Flowers

November Girlie Grunge Sketch-n-Color

As you can see I flipped and turned the sketch, using lanterns for some of the circles.

Tips and Techniques
Mixed Media Layout by Tracey Sabella for Donna Salazar - Love; Wedding; Faith; Handcrafted Flowers
I've used Donna's Spellbinders Grand Peony and Rose Creation dies to create the larger Open Lace Rose flower. The tutorial for this flower can be found HERE.

The photo mat is distressed with Donna's Zutter Distrezz-it-All. I've inked the edges of the paper scraps edging the photo with her Clearsnap Mix'd Media Inx CHOX in Sage - one of the featured colors.

Mixed Media Layout by Tracey Sabella for Donna Salazar - Love; Wedding; Faith; Handcrafted Flowers
Here I've clustered some handcrafted little roses cut with Donna's Bitty Blossoms dies and dusted them with her Clearsnap Twinkle Dust Glitter in Sugar Shimmer. My Bitty Blossom flower tutorial can be found HERE.

Mixed Media Layout by Tracey Sabella for Donna Salazar - Love; Wedding; Faith; Handcrafted Flowers
I've embellished this beautiful chipboard piece from Um Wow Studio by painting and glittering. The top and "strings" are white. I wanted the hearts to be a pale pink, so I twisted my Petals Mix'd Media CHOX Inx onto my craft mat, then a dallop of white gesso. Mixing them tinted the gesso this lovely shade of pink. When dry, I brushed the hearts and upper flourish with glue and dusted with Sugar Shimmer Twinkle Dust Glitter.

I tried a new technique with Donna's embossing powder and glitter. I used Jasmine Mixed Media Inx to stamp out this fun grid circle. I sprinkled with Jasmine embossing powder, tapping off the excess then sprinkled with Twinkle Dust Glitter. I heated from the back of the page until the embossing powder had melted - capturing the sparkly glitter in the process. (If you heat set from the top, you will blow the glitter away before it gets set into the melting embossing power.) It does take a bit longer since the heat is not direct, but definitely worth the wait!!

Mixed Media Layout by Tracey Sabella for Donna Salazar - Love; Wedding; Faith; Handcrafted Flowers
Here's a shot showing some of my background textures. I did more of the glittered embossing for this other large circle stamp. 

I misted the background with water, then with some of Donna's Clearsnap Smooch Spritz in River Mossy, adding even more shimmer and shine. I then splattered with white ink and finished off by adhering a blend of microbeads and chunky glass glitter here and there across the page and around the clusters.

I don't have any close ups of the lanterns, but as you can see in the full photo at the top of the page. I stamped and embossed these images, then adhered Pralines and Cream Twinkle Dust Glitter so they look as if they are glowing and shining. The title is stamped in Stormy Mix'd Media Inx to bring in the final color from the sketch.

Donna Salazar Products
Grandma’s Garden – Garden Journal Cards
GCD Studio ~ Botanique 12” Paper Pad
GCD Studio ~ Natural Beauty 12” Paper Pad
GCD Studio ~ Family Jeans 12” Paper Pad
GCD Studio ~ Mix’d Media Stax 2
Clearsnap ~ Mix’d Media Inx – Jasmine; Stormy
Clearsnap ~ Mix’d Media Inx CHOX – Sage; Petals
Clearsnap ~ Mix’d Media Inx Embossing Powder – Jasmine
Clearsnap ~ Twinkle Dust Glitter – Pralines & Cream; Sugar Shimmer
Clearsnap ~ Smooch Spritz – River Mossy 
Spellbinders ~ Grand Peony
Spellbinders ~ Rose Creations
Spellbinders ~ Bitty Blossoms
Zutter ~ Distrezz-it-All 

Other Products
Um Wow Studio ~ Flair – From the Heart
Um Wow Studio ~ Heart Strings Chipboard
Lace – Stash
Tim Holtz ~ Idea-ology – Accoutrements – Fanciful Buttons
The Charm Shop ~ Heart Charms
David Tutera ~ Pearl Rhinestone Crown Picks
Darice Sequins ~ Crystal Iris
Michaels ~ Metal Embellishments - Keys
Liquitex ~ Gesso – White; Clear
Higgins ~ Drawing Ink – White 
Stampendous ~ Fran-tage – Glass Glitter, Silver
Martha Stewart ~ Micro Beads – Pink Sapphire
Stampendous ~ N*Studio Stamps –  Brush Strokes; Mish Mesh
Close to My Heart ~ Clear Stamps – Illuminate
Forever in Time ~ Clear Stamps – Hearts Medley
Helmar ~ 450 Quick Dry Adhesive; Zapdots, ½” Square, White
Art Glitter ~ Designer Dries Clear Adhesive
Tombow ~ Multi Mono Liquid Glue
Ranger ~ Glossy Accents
Spellbinders ~ Artisan X-plorer
Liquitex ~ Splatter Brush
Darice ~ Heat Tool

Thanks for stopping by! I treasure your comments.
~ Blessings ~

Saturday, November 15, 2014

Autumn Mixed Media Card for Leaky Shed Studio

I created this mixed media card for our daughter-in-law. As you can see, she adores purple which pairs beautifully with autumn oranges, golds, and yellows. I've featuring one of Leaky Shed Studio's gorgeous new release chipboard pieces, the Autumn Leaf Crown along with a classic Victorian Oval Frame

I had so much fun stamping, misting, and glittering the background created on a piece of mixed media water color paper. 


Tips and Techniques
To paint the Autumn Leaf Crown, I watered down some gold metallic paint and brushed it across the bare chipboard. I wanted just a gold shimmer, rather than a heavy metallic look. Once dry, I brushed orange Twinkling H20's randomly across the leaves, and heat set. These paints are no longer available in stores, but you could also mix up any watercolor paint and mix with mica for shimmer or even brush on a sparkling mist.

The Victorian Oval Frame is painted black, then lightly brushed with gold metallic paint. 

The mixed media background was applied to a piece of white mixed media paper brushed with clear gesso. I've stamped and misted using stencils to create the color and design. I randomly applied gel medium and sprinkled with microbeads and chunky glass glitter. 

The rose is edged with Prima's new Art Sugar super fine glitter, and I misted the natural dried phalaris grass with Prima's luscious Sorbet Color Bloom Spray to color it a golden yellow.

One final shot. You can really see here how the colors vary on the chipboard giving the feel of autumn leaves.


Autumn Leaf Crown (New Release)

Other Products
Petaloo ~ Botanica Collection – Minis Yellow #1101103
KaiserCraft ~ Paper Blooms – Aubergine
Natural Dried Phalaris Grass
Liquitex ~ Gesso – Clear; Black
Golden ~ Soft Gel - Matte
Ranger ~ Archival Ink – Jet Black
Prima ~ Color Bloom Spray Mist – Pressed Petal; Sorbet
Tattered Angels ~ Glimmer Mist – Sugar Plum Fairy
Tattered Angels ~ Glimmer Mist – Tiger Lily
Twinkling H20’s ~ Orange Pearl; Black Cherry
Jacquard ~ Lumiere – Sunset Gold
Stampendous ~ Fran-tage – Glass Glitter Bronze; Lavender
Martha Stewart ~ Microbeads – Fire Opal
Prima ~ Art Sugar - Charcoal
Prima ~ Clear Stamp #545055
Stampendous ~ Clear Stamps – Hope Verses
Inky Antics ~ Clear Stamp Set – Magnificent Men
Stampers Anonymous ~ Layering Stencil – Dot Fade
Americana Classic ~ Stencil – Jacobean Floral
Helmar ~ Crystal Kote Matte Varnish
Helmar ~ 450 Quick Dry Adhesive
Helmar ~ Liquid Scrap Dots 
Tombow ~ Multi Mono Liquid Glue
Tim Holtz ~ Grid Blocks

Thanks for stopping by today! I treasure your comments.
~ Blessings ~