Monday, February 25, 2013

"You Mean the World" Details

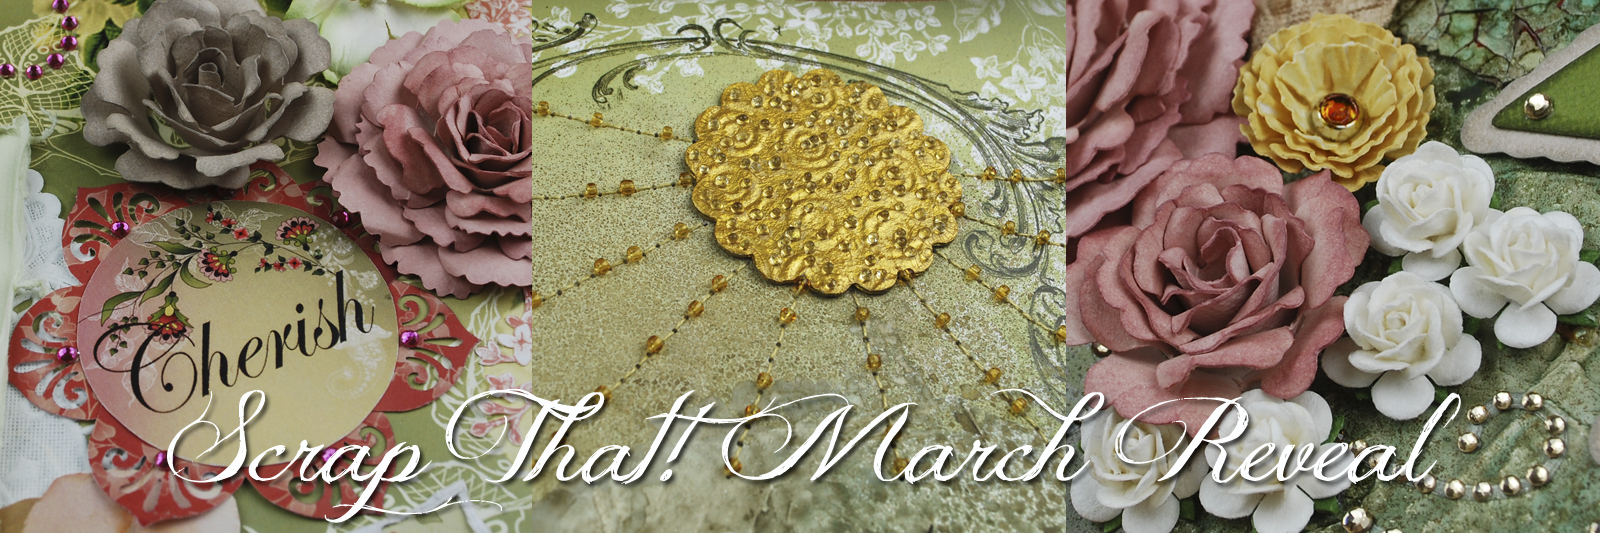
I'm back with my "You Mean the World" layout to share some more details with you. I used the OUAS February Sketch and journaling prompt "Love" to create this page. I have also entered this page at Zeus and Zoe for their February "Love" Challenge.

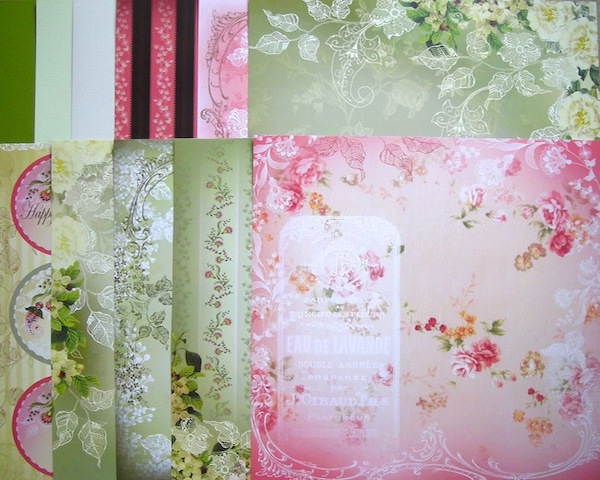
Love is an easy challenge for me to scrap these days with the amazing wedding photos I have waiting to be scrapped. Our daughter, Elizabeth, married her soul mate, Andrew, in October. These Meg's Garden papers featured in the March ScrapThat! Kit were so perfect for a love page!

"You Mean the World"
ScrapThat! Main Kit, EAO, FAO, PAO

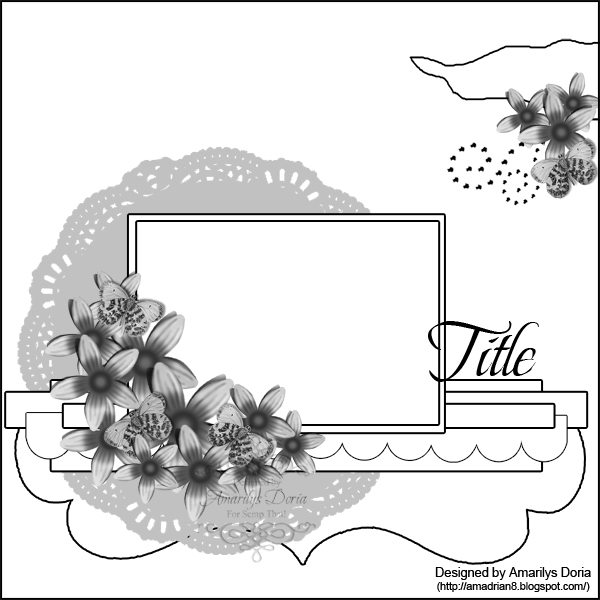
Here is the gorgeous February Sketch at OUAS:

Tips and Techniques:


Ribbons ~ Kaitlyn always includes gorgeous ribbons in the main kit. This month it is ivory grosgrain and crinkle ribbon. The crinkle ribbon tied into the most gorgeous double bow leaving 4 ends to flow atop the paper ribbons I created out of paper scraps from the kit. I also layered in some of the grosgrain ribbon. To create the paper ribbons, simply cut out strips of paper with a V cut into each end. I like using at least two colors - here green and pink. I cut my strips 5/8 inches wide, but you could cut them any width you desire and could even mix up the widths. Once cut, I used my Prima Distressing Tool to lightly distress the edges, then crinkled and bent up the paper to give it a soft, fabric-like appearance. 

Flowers ~ I pulled the white Prima flower from the EAO kit apart so I could have a larger variety of sizes for my flower cluster. I tucked a handcrafted Bitty Blossoms flower into the center of the larger piece. A tutorial for the large pink rose created with Donna Salazar's Grand Peony and Bitty Blossoms Spellbinders dies can be found HERE. The tiny roses were created with petals punched with my McGill Mini Petals punch. 


Crackled Chipboard ~ I added this DA frame chipboard piece from my stash. I first covered it with cream Viva Decor Pearl pen. The pen is designed to create pearl shapes, but I used it like paint and with the applicator tip, swirled the pearl medium across the entire chipboard piece and allowed it to dry. It looked gorgeous at that point, but I wanted to use the Smooch Accents included in the main kit, so added the green Smooch across the leafy vine portion of the chippie. This medium takes a LONG time to dry when applied to a nonporous surface like the dried paint here, so I heated it with my heat tool. To add more texture, I heated until it bubbled. The dry pearl medium also bubbled up creating a lovely texture, but I wanted even more, so covered the entire piece with Clear Rock Candy Crackle Paint to get these lovely cracks when dry. I allowed the crackle to air dry. 

Prima Wood Pieces ~ The leaves tucked into the ribbon/flower cluster are some of the new Prima release from my stash. I just painted them with the Smooch and allowed to dry. On the porous wood surface, the smooch dried much faster. 

Transparency ~ For the Scrapthat! DT Challenge this month, Laura has selected several quotations for you choose from. As an example, I used this one: "To the world you're just one person, but to one person you could mean the world." I left out the word could, since Andrew for sure thinks the world of Elizabeth. I have also added some personal journaling to the back of the page to meet the requirements of the journaling challenge at OUAS. Because they are of a personal nature to Elizabeth, I have not shared them here. Both the quotation and the block LOVE were printed on a ink jet transparency. To adhere, I sprayed the backs with Krylon spray adhesive, but any clear, acid free spray adhesive will work. 

You will find the details of Laura's ScrapThat! DT Challenge HERE. You can select one of her quotations and/or take a page you've been wanting to redo and recreate it. She's giving you the opportunity for two chances to win this month. 


Butterfly Flourish ~ This gorgeous DA piece was included in the main kit. I simply flipped it to the back side to properly fit my page design. I painted with Luminarte Twinkling H20's and added a touch of perfect pearls to achieve the right color for the flower. The main kit Kaisercraft pearls created such wonderful dimension on the body of the butterfly. The trail was created with snippets of a Zva flourish from my stash. 

Distressing ~ The outer edges of the page were distressed with my Donna Salazar Zutter Distrezz-It-All. 


Layered Hearts ~ I cut heart templates on my Cricut and used them as a pattern to hand cut these sweet hearts. I hand cut so I could select the pattern that would be featured on each layer, then distressed lightly with my Prima Distressing Tool. I hand stitched down the center and folded the hearts up for added dimension. This sweet black Prima flower is from the FAO kit. 

I have also entered this at:
Word Art Wednesday ~ Challenge #68 - Psalm 119:80 Word Art or Anything Goes

Thanks for stopping by! I treasure your comments.
~ Blessings ~ 

Friday, February 22, 2013

ScrapThat! March "New Blooms" Kit Reveal and Blog Hop

Welcome to the Scrap That!
March Kit Reveal and Blog Hop!! 


You should have come here from
Sarah Routledge

If not then head back to ScrapThat! to start the hop! 

We are so excited to show you this beautiful and fresh kit! Not only does it feature papers from meg's Garden, but Meg's Garden is also joining us on our hop and offering this gorgeous Spring Paisley Card Makers RAK on their blog! 


The individual papers are the same ad the 12" design but are reduced to 6" for use on cards, OTP, tags, etc. . . It can also be used as part of a layout. The pack comes with mini pics approximately 2 " which are perfect for the front or inside of a card, tags OTP as well as scrapbooking. 

We are so thrilled to welcome the fabulously talented artist 
Limor Webber
as our March Featured Guest Designer! 


Limor is known for generously sharing her amazing mixed media techniques. Her YouTube Channel with all her fabulous videos can be found here, and her fabulous blog is here. She designs for a number of companies including FabScraps, I Am Roses, Lindy's Stamp Gang, and guest designs for Faber-Castell. She has made some glorious creations with our March kit and will have a tutorial for us all as well!

We are saying goodbye this month to
one of our amazing ScrapThat! designers,
Sandi Smith.


Sandi, you have been an amazing inspiration in both your stunningly creative projects and your sweet spirit. We wish you everything wonderful and know that you will succeed with everything you do! We were blessed to have you!

Our farewell to Sandi brings the excitement of introducing our new 
ScrapThat! designer and Social Media Coordinator, 
~ Laura Gilhuly ~


Here is a little about Laura:
I am Laura (often know as AngelBear). I live in a small town in south-western Ontario with my family. I love to ink, tear, layer and distress my projects!  The dirtier the better.  I like to blog too which you can find at http://angelbearscraps.blogspot.com/ and you can see some of my layouts at scrapbook.com.  My family is the focus of my life, my inspiration, and my motivation to scrapbook.  For the full bio on Laura see our March Sneak Peek post!

Welcome to the team, Laura!

Now, without further ado,
 introducing our fabulous March Kit, 
"New Blooms"

Featuring the oh, so lovely, Meg's Garden Spring Paisley Collection and loaded with Prima goodies, this kit boasts the most beautiful shades of green and pink, just perfect to bring a little spring into our winter! There are also neutrals and some funky accents to allow for creations from shabby chic to masculine to mixed media. Take a look:

Main Kit

Embellishment Add-On

Flower Add-on

Paper Add-on

More details on this romantic collection can be seen here:

We are currently accepting new Kit Club Members.
For more information, 
For more information, complete the form on the link below:

Look at the beautiful sketch Amarilys has created for March:

See details about the challenge here: Sketch Challenges.
Be sure to also check our the details fo our monthly DT Challenge 
hosted by Laura here" DT Challenge.

Everyone is welcome to participate. 
All entries for both challenges are due by March 27.
Something new! All winners of our challenges, including Layout of the Week, will be eligible to receive 10% off any 2012 Kits. This includes Add-ons! 

The first page I have to share with you was inspired by Amy's amazing sketch. One of my favorite of Elizabeth's wedding photos is this one of her dancing with her father. 

"Cherish this Moment"
MK, EAO, FAO

There are so many fussy cutting opportunities with this gorgeous Meg's Garden paper. For this page, I cut the scallop across the bottom along with leaves and blossoms tucked into the clusters. You have to love the Prima buttons and gears to add a masculine touch along with the Tim Holtz film strip. I used the cheese cloth to add softness around the photo. From my stash I added the crystal flourish, a doily, and the dragonfly chipboard piece by Gina's Designs. The cardstock included in the main kit is perfectly paired to use for creating gorgeous coordinating flowers! 

~ ~ ~ ~ ~

Next I have a page that is a bit out of my norm. It was one of those rare mements when I pictured the page in my mind and then set out to create it. This is our Elizabeth when she was little taking a ride with her cousin, Tyler. 

" Movin' On"
Main Kit

I used just the main kit for this sweet page, and a couple items from my stash. The road is created from a piece of chipboard. I cut a winding road, covered it with eggshells, which I alcohol inked, inspired by Gabrielle Pollacco. I also had some mixed media fun that I will tell you all about in March. I have a tutorial planned to teach you how to create a sun like the one on my page. I added the eyelets for the banner  The Zva crystal flourish, and grass chippies. The lovely white rose buds are part of the amazing main kit and I created the remaining flowers. Aren't the skeleton leaves dreamy? 

~ ~ ~ ~ ~

My final project for you today is another wedding day photo of Elizabeth smiling at the camera and her future with Andrew. Be sure to check out Laura's DT challenge this month. I used one of the phrases she listed to enter the challenge: "To the world you're just one person, but to one person you mean the world." I have included some journaling on the back of the page about my prayers for Elizabeth over the years to find a soul mate who would treasure her and appreciate her for who she is. 

"You Mean the World"
MK, EAO, FAO

I used this sketch from Once upon a Sketch for inspiration:


I printed my journaling and the Love blocks on ink jet transparency paper. I hand stitched the layered hearts together. The flowers in the EAO and FAO are simply gorgeous. Don't you love the black medallion flower below the heart? The MK includes this amazing Dusty Attic chipboard butterfly.  The pearl body was created from the main kit Kaisercraft pearls. The Smooch Accents was so fun to work with!! i used to color the green vines in the chipboard frame and little Prima wood flowers. I added both of these pieces from my stash as well as the Zva flourish. 

Now on to our Blog Hop details:

Our Blog Hop features 11 fantastic hop sites including our Design Team blogs. 
We have been scrapping away and are so excited to show you our  creations!

Our SPECTACULAR March Blog Hop Prize
is a ScrapThat! July Main Kit,
 "Summer in My Garden", featuring Fabscrap's Organic Collection:


To qualify for this month's FABULOUS Prize, 
you must complete the following:
* Visit each blog listed on the hop to see what each designer has created using this month's kit and sketch(comments are very much appreciated).
* Each designer's blog hop post will feature a word to make up a secret sentence, collect these words along the way.
* You must become a FOLLOWER of each blog along the way and LIKE us on our Facebook Page!
* Post the ScrapThat! Blinkie on your blog.
* For your last stop on our Blog Hop return  to the ScrapThat! Chat Blog.
Leave a comment letting us know you have
completed the hop.
(Please do NOT include the secret sentence in your comments.)

*Email the secret sentence to Tracey Sabella:tracey@scrapthat.ca
The Blog Hop ends Sunday, February 24 at Midnight EST

The prize MUST be claimed within 3 days of the forum announcement which will also be made on the ScrapThat! Blog.
~ If left unclaimed a NEW winner will be chosen ~
**Winner will pay actual shipping costs for sending the kit from Canada.**
Shipping costs will be invoiced via PayPal unless you are a kit member, then your prize will be shipped with your monthly kit.
Prizes won during the month will be mailed out the first week of the following month.
Due to Customs clearance, International mailings sometimes take 30-75 days to receive.

My secret word is: 
LIFE

Next hop over to :
Should you lose your way, here is the Blog Hop order:
Scrap That! 
Tracey Gregory 
ScrapThat! Facebook Page 

For your final stop, return to the ScrapThat! Blog
to let us know you have completed teh hop.
Remember ~ only send the secret sentence to tracey@scrapthat.ca

Happy Hopping

Wednesday, February 20, 2013

ScrapThat! March "New Blooms" Kit Sneak Peeks and New Designer

Good morning. It is almost reveal day at ScrapThat! Our designers have been busy creating projects to inspire you with this gorgeous, jam packed kit. Here is a little sneak peek:


Be sure to come back on Friday for our full kit reveal and blog hop. Visit each of our designers blogs for a chance to win a ScrapThat! July "Summer in My Garden" main kit. We have a special guest joining us this month who will be offering an additional prize drawing for one of our hoppers as well. 


_____

Now on to more exciting news . . .
Scrap That! is excited to welcome our newest design team member and 
Social Media Co-ordinator, Laura Gilhuly. 


We are so excited to have Laura designing with us. You are sure to be inspired by her gorgeous work and sweet spirit. Stop by our ScrapThat! Chat blog for Laura's bio. 
You can find Laura's gorgeous work on her blog, 
Angel Scraps.

I would also like to say a special farewell to our amazing designer, Sandi Smith. It has been a delight to work with Sandi since coming on board with ScrapThat! She is so very talented, and I wish her all the best. 

I would like to leave you with a couple more sneak peeks. You won't want to miss the reveal on Friday!! 


Thanks for stopping by! I treasure your comments.

~ Blessings ~

Sunday, February 17, 2013

"Dreams" ~ SEM Sketch Challenge - Guest Designer

Today I'm so excited to share my second guest designer project for Scrapping Everyday Miracles. Today is their sketch challenge reveal. This gorgeous sketch was created by the talented Tracey Gregory, and there is a twist - you will need to use distressing on your page. 

I shared a little yesterday how Elizabeth had determined that she wanted to save her heart and affections for her one true love. I remember when she was an early teen, a conversation where she told me if God could bring all those animals to the ark, certainly He could bring the one guy He meant for her to marry into her life. She kept a list of all the qualities that special guy would have. Although she didn't date, she dreamed about that special guy. When she met Andrew at church, she found someone who met all those dreams and more. Her heart was set a flutter. The great thing is that our Lord drew Andrew's heart to her as well. Elizabeth's dreamy expression in this photo says it all. Those dreams she had of her one true love were about to all come true in a few short moments. 

"Dreams"

Tracey Gregory's gorgeous SEM February Sketch:

To join the SEM Challenge. Create a page inspired by this gorgeous sketch and include some distressing. Then hop over to Scrapping Everyday Miracles to link up your project by February 28 at 11:59 pm. The challenge winner selected by Random.org will receive a February Kit donated by My Creative Scrapbook.

There is no challenge up at Donna Salazar this month, but when I was pulling papers for this page, I was drawn to her fabulous products, so you'll be seeing them featured on this page. 

Tips and Techniques:

Distressing ~ I'll start with the technique "twist." I distressed all the border edges with my Donna Salazar Distrezz-It-All. I also distressed the background paper with Donna's Smooch Spritz. I misted where I had planned this cluster, used a dropper with some watered down mist to add some drips. I spritzed some mist on my craft mat and then misted over top with an equal amount of water. The mist beaded up and I was able to easily pull it up with a dropper so I could create these fun drips.

Stick Pin ~ I used some beads from my stash to create this stick pin pulling the colors from the pink flowers in the page border.

Focal Flowers ~ I've been wanting to try cutting fabric flowers using my Donna Salazar Grand Peony Spellbinder dies. When I saw the large focal flowers in Tracey's sketch I knew the time had arrived to give it a try. I used two layers each cut from 4 sizes of this die set. I melted the edges on a tea light candle flame, which cups the petals. A cluster of stamen in the center finished them off. 

Paper Flowers ~ The paper flowers were created with my Donna Salazar Bitty Blossoms Spellbinder Dies. These flowers are so quick and easy to create using the scraps of paper from this Botanique sheet used as one of my distressed edge layers. The paper I cut out of the center of this layer created all these gorgeous blossoms.

Pearlized Chipboard ~ I pulled some Want2Scrap chipboard flourishes from my stash and to keep my dreamy theme going, used a Viva Pearl Pen to create the pearlescent sheen on my chipboard. Normally these pens are used to create pearl shaped embellishments, but I squeezed the pearl medium across the entire chipboard pieces in a swirled motion.

Leaves ~ These leaves were so easy to create with my Donna Salazar Bitty Blossoms Dies. I cut and embossed them. While still in the dies, I inked with Donna's Jasmine Mix'd Media Inx, then removed from the die, sprinkled with a pearlescent embossing powder and heat set. Easy peasy and so pretty. 

Rhinestone Piece ~ I collect jewelry findings when I see them on clearance. This rhinestone piece fit so perfectly into this cluster.


Jeweled Butterfly ~ I cut this butterfly from Donna Salazar's Wonderful Wings Spellbinder dies, and topped it with this gem sticker from Want2Scrap. 

Butterfly Trail ~ I drew the trail in pencil, pierced holes along it. I erased the line, then stitched,  attaching seed beads randomly along the way.


Stamped Title ~ I used the Donna Salazar Banner and Words stamp set with her Pewter Mix'd Media Inx to stamp my title, then sprinkled with Ranger Super Fine Silver Embossing powder and heat set. When cool, it was fussy cut for my title.

Embellishments ~ I glued on silver lined clear seed beads from my stash with Glossy Accents. The pearl/rhinestone strip below the photo is from Want2Scrap and the lace tucked into the tear is from my stash. The crystal flowers tucked in throughout the page are by Bazzill.

I hope you have been inspired to create a page with Tracey's fabulous sketch. Once you have finished it, head on over to Scrapping Everyday Miracles to link up your project.

Donna Salazar Products Used:
Bontanique ~ Bliss
Grandma's Garden ~ English Roses
Grandma's Garden ~ Garden Journal Cards
DSD/Spellbinders ~ Grand Peony
DSD/Spellbinders ~ Bitty Blossoms
DSD/Spellbinders ~ Wonderful Wings
DSD/Want2Scrap ~ Wonderful Wings Bling
DSD/Clearsnap ~ Smooch Spritz - Evergreen
DSD/Clearsnap ~ Mix'd Media Inx ~ Jasmine
DSD/Clearsnap ~ Mix'd Media Inx ~ Pewter
DSD/Stampers Anonymous ~ Banner and Words Stamp
DSD/Zutter ~ Distrezz-It-All

Other Products Used:
Want2Scrap ~ Chipboard Embellishments Style A
Want2Scrap ~ Chipboard Embellishments Style C
Want2Scrap ~ Beautiful Bling Strip Pearl/Crystal Wave
art.i.cake by Amy Labbe - Charms with Glass Accents #AL29287
Darice ~ Silver lined clear seed beads
Martha Stewart Punch Around the Page ~ French Scroll
DMC Embroidery Floss ~ White
Bazzill ~ Worth Remembering Resin Flowers #303894
Viva ~ Pearl Pen - Cream
Sparkle N' Sprinkle ~ Opaline Embossing Powder
Ranger Super Fine Detail Embossing Powder ~ Silver
Stash ~ Doily
Stash ~ Lace
Stash ~ Stamen
Stash ~ Beads for stick pin

Adhesives:
Helmar 450 Quick Dry Adhesive
Scotch ATG
Ranger Glossy Accents
Scrapbook Adhesives ~ Crafty Power Tape

I have entered this at:
Word Art Wednesday ~ Challenge #68 Love/Anything Goes**
Anything Goes Challenge Blog ~ Challenge 86 Vintage/Shabby Chic**

Thanks for stopping by! I treasure your comments.

~ Blessings ~ 

Saturday, February 16, 2013

"Dream Come True"

It was such a joy to our family when Elizabeth and Andrew announced their engagement last May. Elizabeth decided at an early age that she didn't want to date a lot of guys, but would wait for the Lord to bring just the right man into her life ~ Andrew, her "Dream Come True." Here are the details on my final page created with the wonderful February ScrapThat! Kit. 

"Dream Come True"
MK, EAO, FAO

I flipped Amy's fabulous February ScrapThat! Sketch for this page:

I hope you will create a page for our Sketch Challenge using this sweet sketch. The details can be found here.

Tips and Techniques:


Full Open Rose ~ The tutorial for the focal rose using Donna Salazar's Grand Peony and Bitty Blossoms Spellbinder dies can be found here. I used the Smooch Accents included in the kit to color the edges of the rose. 

Chipboard ~ I tinted texture paste with Distress reinker and spread it across my chipboard piece. When dry I went back and inked the edges for more depth and visual dimension. 

Cluster ~ Aren't these sweet pink flowers in the main kit just darling? I coiled the wire snipped from the blossoms to create the vines. 


Beads ~ I was inspired by a project created by ScrapThat! designer, Tracey Gregory, to add some scattered beads to my page. I also dabble in creating jewelry and have lots of seed beads in my collection. I used tweezers to dip each bead in Glossy Accents and place on the page. The Glossy Accents is a great glue for this. Just a little dab has a lot of holding power and dries perfectly clear. 


Hearts ~ The canvas heart included in the main kit were stamped with different designs and the edges inked. The little charms were from a package of charms I found clearanced at my craft store for a mere 50 cents a while back. 

Sparkling Strip ~ I created this sparkling strip by placing a 12 inch piece of Crafty Power Tape on my craft mat. I then sprinkled some different embossing powders and mica flakes on the adhesive. I melted them with a heat tool. The back of the tape remains sticky, so I just pulled it up and placed it down the center of the hearts. 


Title Block ~ I fussy cut one of the notebook pages and inked with Distress ink. I used texture paste over a doily stencil and stamped my title in the center of the doily.

Distressing ~ What is a page without pulling out my Donna Salazar/Zutter Distrezz-It-All? I love the texture I get with this machine. 


Cluster ~ More of the sweet Main Kit flowers spilling out of the peak-a-boo tear. I tied some charms with the silky pink baker's twine also included in the kit. 

Hand Stitching ~ You can see my hand stitching around the page border. I also stitched around the photo mat. 

ScrapThat! also has our DT Challenge to create a page with at least 4 layers of patterned paper. I hope you'll come on over and add your project. Details can be found here.  

Be sure to come back tomorrow to see my guest designer project for Scrapping Everyday Memories. Here is a sneak peek from my page featuring my stash of Donna Salazar goodies:


Thanks for stopping by! I treasure your comments. 

~ Blessings ~ 

Monday, February 11, 2013

"A New Life" Scrapping Everyday Miracles February Guest Designer

I'm so excited to be the February Guest Designer for Scrapping Everyday Miracles. SEM is such a special place to share our scrappy work and what the Lord is doing in our lives! Thank you Nicole for offering me this chance to be a part of SEM this month."

I would like to share my take on the SEM February Main Challenge ~ Home is Where the Heart Is, to scrap about where we feel most at home. The Scrap Twist is to use a tag or journal block to include the details. 

Our daughter, Elizabeth, married her soul mate, Andrew, in October. From the time our children were conceived we have prayed for their future homes. We pray both that our Lord will reveal the marriage and life partner He has for them and that He would be working in that individual's life to prepare them to be the Godly man or woman He has called them to be.

We raise our children in our home for the very purpose of them one day leaving us to establish their own Godly home. Deuteronomy 6 talks of us loving our Lord with all our heart, soul, and might and to obey His commandments. Then we are to teach God's ways to our children as we live out our lives before them. Why? To pass on the rich heritage and relationship with our Lord, so that in time they will have a home that serves our Lord as well. Deuteronomy 7:9 tells us that God is faithful to keep His covenant and His lovingkindness to a thousandth generation with those who love Him and keep His commandments. What an amazing promise to claim for our children, their spouses (future and current) and homes. Oh, and those Grandchildren, yet to come into our lives. 

The wedding photo I selected for this challenge is of the candle ceremony, a symbol of their two lives becoming one. Elizabeth is leaving our home to be one with Andrew to start their new home and lives together.

"A New Life"

The twist is to include a tag or journal block with details.


The details are included in hidden journaling on the back of my tag. "A new life and a new home begin today. May our Lord always be the center of both. Deuteronomy 6" 


The tag was cut with a Tim Holtz die, inked with Distress ink and the stamp is also from Tim Holtz. Last week I picked up a selection of steam punk jewelry findings at Michael's clearenced to 70% off the marked down price and this sweet charm is part of that lot. The glittered heart was a bit too pink, so some espresso alcohol ink toned the pink down quite nicely. I attached a blue bead from my stash. 

My background was created by inking the edges of this Ruby Rock-It paper with several colors of Distress Ink. I then sprayed glimmer mist across the page and used a dropper to create drips where I would be placing my cluster under the photo. 

The large focal flower is from Manor House and the smaller blue flowers are handcrafted using Bitty Blossoms dies. The flourish is another Michael's find.

I used clocks in several ways to help convey the idea of a new home and life together. First I inked a clock image behind this cluster using a stencil. I spritzed my chipboard grass with a green chalk mist and pulled some fiber from a fabric scrap to lay across the bottom of the cluster. The sweet flowers are Prima.

Here's my tip for Top Tip Tuesday ~ Fibers can be pulled from a fabric scrap. To adhere, lay on a scrap of paper and spritz with spray adhesive. Carefully place on page or card.

And next to the photo I used a patina finish on this KaiserCraft wood clock piece. I discovered Sophisticated Finishes products a few months ago and painted the wood piece with their gold paint, then applied the patina. The patina wasn't quite as green as I wanted, so I added a few touches of distress ink as well. 

The shutters are from a resin pack I purchased from Michael's a while back. 

I hope you are inspired to create a page about where you feel most at home to join the SEM February Challenge. Details can be found here.


I have entered this at:
Crafty Cardmakers Challenge 84 - Vintage Love ~ I used a winged heart charm to represent love. (Feb 18) **
Anything But a Card Challenge 12 - Share the Love (Feb 18) **
Come and Get it Challenges - Show us your Heart - Love Is in the Air ~ Winged heart charm (Feb. 16) **
2 Sisters Challenge Blog Challenge #130 - Hearts ~ Winged heart charm (Feb 16) **
One Stop Craft Challenge 215 - Love Is in the Air (Feb 16) **
Top Tip Tuesday Challenge - Let Me Call You Sweetheart (TIP) (Feb 20) **

Thanks for stopping by! I treasure your comments. 

~ Blessings ~

Friday, February 8, 2013

"A Perfect Day" Details ~ ScrapThat! Feb. Kit

I'm back today to share the details of "A Perfect Day" Created with the February ScrapThat! Kit. As you may remember, Elizabeth brought Andrew into our family back in October. We were delighted to receive the wedding photos last month just in time for me to use one to create the final LO with my gorgeous February Kit. Aren't they a sweet couple?

Before I share the details, I have some exciting news to share. My Misted Rock Salt Chipboard Tutorial has been published by Scrapbooking.com. They have taken my photos and created a wonderful video tutorial. I hope you will stop over there to check it out. Here are the links:


"A Perfect Day"
MK, EAO

Tips and Techniques:


Ribbons ~ I used the cream cardstock in the kit to cut ribbons. I then used a foam applicator to apply Distress inks to pull out the colors found on the focal background paper. Finally I distressed the edges with my Prima distressing tool and edged with a darker distress ink. To make them look more like actual ribbon, I gently bent and crumpled them until they had a soft fabric like appearance. I then snipped some pieces from two of the kit ribbons to layer over top of the paper ribbon strips. Our former DT, Marilyn Rivera, is a master of transforming paper to look and drape like fabric and I got this idea from her. You will be inspired by a visit her blog, Treasuring Memories.

A side view:

Netting ~ The kit came with gorgeous netting that works so well to add extra dimension. Here I tucked some behind my flower cluster.

Wood Heart Flourish ~ I painted the KaiserCraft Heart with gold metalic paint and when dry stamped across the piece with a script stamp using black Stazon.


Chipboard Frame ~ I added this Dusty Attic Chipboard piece from my stash. I love this photo, but Andrew's had around Elizabeth's shoulder a bit pronounced when placed on a scrapbook page. Using the chipboard piece to frame and layer over the photo took care of that little "problem." The technique here is so easy peasy. I simply painted with metallic paint and when dry took some Distress ink in a darker shade to add dimension on the edges. 

Puffy Hearts ~ These Green Tara hearts are included in the EAO kit. They were just a little bright for this page, so I spritzed them with some cork Glimmer Mist to get more of a burgundy color. 

Distressed Layers ~ I framed the photo with two of the kit cardstock papers and used my Donna Salazar/Zutter Distrezz-It-All on the edges. Behind the top right corner, I placed a corner from the gorgeous square doily found in the main kit. 


Medallion ~ The kit includes these kraft journal spots which made the perfect base for my medallion. The pearl ribbon slide is also in the kit and the paper ribbons are described earlier. The metal heart is from my stash. 

Hand Stitching ~ I drew a swirled line around the border of my layout in pencil, then went back and pierced stitching holes, erased the pencil mark and stitched with coordinating embroidery floss. I used to cross stitch, so I have an entire box of DMC floss to choose from. 


Mixed Media Butterfly ~ What is a page without some mixed media? I used some Martha Stewart White Texture Effect over one of her butterfly stencils, then sprinkled on some gold microbeads. 


Title ~ This really was a perfect day, so this title worked perfectly for my page. Originally, I cut it out in the beautiful bracket frame from the page. I brushed on some Ranger Rock Candy Distress Paint. I didn't set it aside far enough to allow it to dry, because I accidentally laid some scrap paper on top, ruining the edge. It was one of those happy mistakes, since I like the words cut out better than I did in the frame. I'm here to tell you, always look for the lemonade when those scrappy lemons happen. 

The February Kits are now in the ScrapThat! Store, so be sure to drop by and get yours before they are sold out. 

I hope you will have a chance to stop by and see my Misted Rock Salt Video over at Scrapbooking.com. 

Thanks for stopping by! I treasure your comments.
~ Blessings ~